Picture this: you flip the switch, steam curls up, and the water hits just the right temperature—your brand‑new shower becomes the centerpiece of your Florence bathroom.
Most homeowners stumble over tile choices, shower heads, and permits, ending up with a half‑finished mess that drains both time and cash. I’m about to hand you a clear, step‑by‑step playbook that cuts the guesswork and gets you soaking in style fast.
Stay with me, and I’ll walk you through every decision—from layout to lighting—so you can skip the headaches and start enjoying that perfect shower sooner than you think.
Assessing Your Space and Setting a Realistic Budget
Measure What You’ve Got
Grab a tape, walk the perimeter, and jot down length, width, and ceiling height. Don’t trust guesswork—even a half‑inch error can throw off tile layout and shower pan size. Note any low‑lying beams, vent fans, or recessed niches that will dictate framing and waterproofing.
Know Your Money Limits
Start with a ballpark figure, then break it down into real line items. This prevents surprise invoices when the contractor shows up with a pricey faucet.
- Tile and stone – 30‑40% of the total
- Shower fixtures – 15‑20%
- Labor and waterproofing – 25‑35%
- Permits and contingency – 10‑15%
Set a Buffer and Stick to It
Allocate at least 10% extra for unexpected issues like rotten joists or hidden plumbing. Keep the buffer separate from the main budget so you won’t be tempted to dip into the design fund when the surprise pops up.
Designing the Ideal Shower Layout and Configuration
Pick a configuration that works for you
First, decide if you want a walk‑in, a corner stall, or a curbless barrier‑free shower. Each option changes how you move, how you store, and how the room feels.
Ask yourself:
- Do you need a bench or niche for toiletries?
- Will a glass enclosure make the space look bigger?
- Is a linear drain better for your floor slope?
Map the flow before you cut any tile
Draw a quick 1‑foot‑by‑1‑foot grid on paper or a tablet. Mark the showerhead, controls, and any built‑in shelves. Keep the controls outside the spray zone so you don’t get soaked while adjusting temperature.
Leave at least 30 inches of clear floor space for a comfortable stride. If you’re adding a bench, give it a minimum of 18 inches depth.
Think about traffic and privacy
Position the shower away from the bathroom door if possible. This reduces drafts and keeps steam where you want it.
Consider a sliding glass door or a full wall if you share the bathroom. It blocks water splash and adds a touch of luxury.
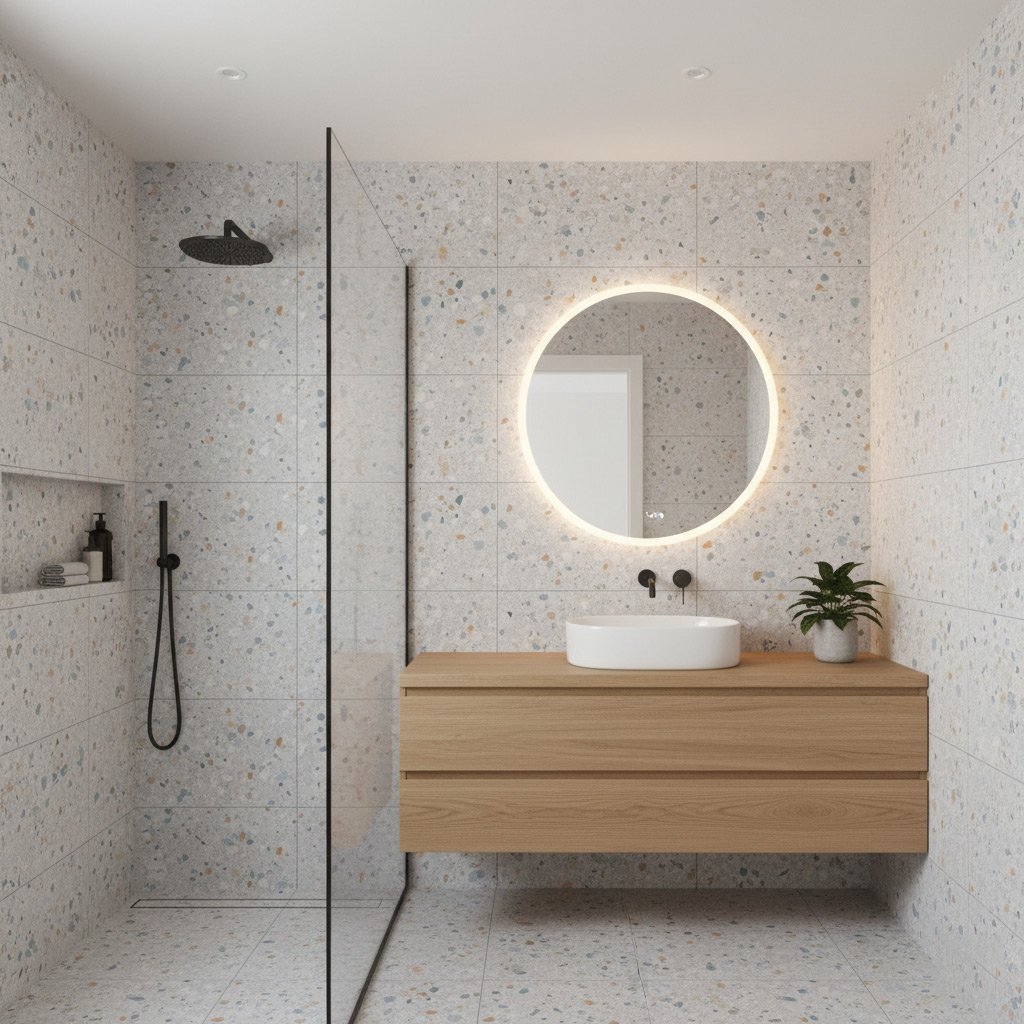
Picking Tiles, Fixtures, and Finishes That Complement Florence Style
Tile Choices that Echo the Sonoran Landscape
Think desert‑inspired hues—warm sand, muted terracotta, and cool sage. Large-format porcelain mimics natural stone without the upkeep, while a subtle wood‑look tile adds a touch of Southwestern charm.
- Rectangular 12×24 tiles for a sleek, modern feel.
- Hand‑troweled mosaic accents for a pop of texture.
- Matte finish to hide water spots.
Fixtures & Finishes that Speak Florence
Brass, oil‑rubbed bronze, and matte black dominate local bathrooms. Choose a single‑handle thermostatic valve for precise temperature control and a sleek silhouette.
- Rain‑shower heads for a spa‑like experience.
- Wall‑mounted handhelds for flexibility.
- LED‑lit vanity mirrors to keep the space bright.
Mixing Materials Without a Clash
Pair a bold tile border with a neutral shower pan to keep the eye moving. Balance is key—if you go heavy on texture, let the hardware stay simple.
- Use the same metal tone across faucets, towel bars, and hooks.
- Introduce natural wood or reclaimed timber for a warm contrast.
- Stick to two‑tone palettes to avoid visual overload.
Securing Permits and Meeting Plumbing & Electrical Codes in AZ
Why the paperwork matters
In Florence, the city clerk won’t let you pour a new shower pan without a permit, and the inspector will shut the job down if the wiring isn’t up to code. Skipping this step saves you minutes, not dollars. A clean permit file protects your resale value and keeps insurance from turning its back on you.
Getting the green light
Follow this quick checklist to avoid the back‑and‑forth with the Planning Department:
- Download the Residential Plumbing Permit Application from the Town of Florence website.
- Sketch a one‑page layout showing drain location, water supply lines, and any new vent pipes.
- Attach product specs for the shower valve, mixer, and any LED lighting you plan to install.
- Pay the modest fee (usually $75‑$120) and schedule the plan review.
Once the plan is stamped, you’ll receive a permit packet with a unique number. Keep that number handy; the inspector will ask for it before the final walkthrough.
Staying on the right side of code
Arizona’s plumbing code mirrors the International Plumbing Code, but there are a few local quirks:
- All shower drains must be a minimum 2‑inch PVC pipe with a trap and vent within 6 feet of the fixture.
- Water‑supply lines need a shut‑off valve within 18 inches of the shower valve for easy maintenance.
- Electrical work must be performed by a licensed Arizona electrician; GFCI protection is mandatory for any outlet within 6 feet of the shower.
- Any recessed lighting must be rated UL‑listed for wet locations and installed behind a waterproof housing.
When the inspector arrives, hand over the permit, point out the trap, the shut‑off, and the GFCI. A quick nod, and you’re clear to move on to the finishing touches.

Step‑by‑step Installation: Demolition, Framing, Waterproofing, and Finishing
Demolition: Clear the Way
First, shut off water and electricity. Rip out the old tub, tile, and any damaged backer board in one clean sweep. Keep the debris in a tarp; it makes cleanup a breeze and protects the rest of the house.
Framing & Waterproofing: Build a Leak‑Free Shell
Once the space is bare, reinforce the studs where the new shower will sit. Install a moisture‑resistant green board and then lay a continuous waterproof membrane—no gaps, no shortcuts.
- Apply a primer that bonds the membrane to the substrate.
- Seal all seams with a high‑quality tape.
- Run a pre‑sloped shower pan to guide water toward the drain.
After the membrane cures, double‑check every corner with a flood test. If water stays put, you’re ready for tile.
Finishing Touches: Tile, Trim, and Test
Lay your chosen tiles using a thin‑set mortar; work in small sections to keep the adhesive fresh. Grout with a non‑porous formula, then seal it to fend off stains.
Install the shower valve, head, and any niche shelving. Turn the water back on, run the shower, and watch for drips. A clean run means you’ve nailed it—now step in and enjoy the result.
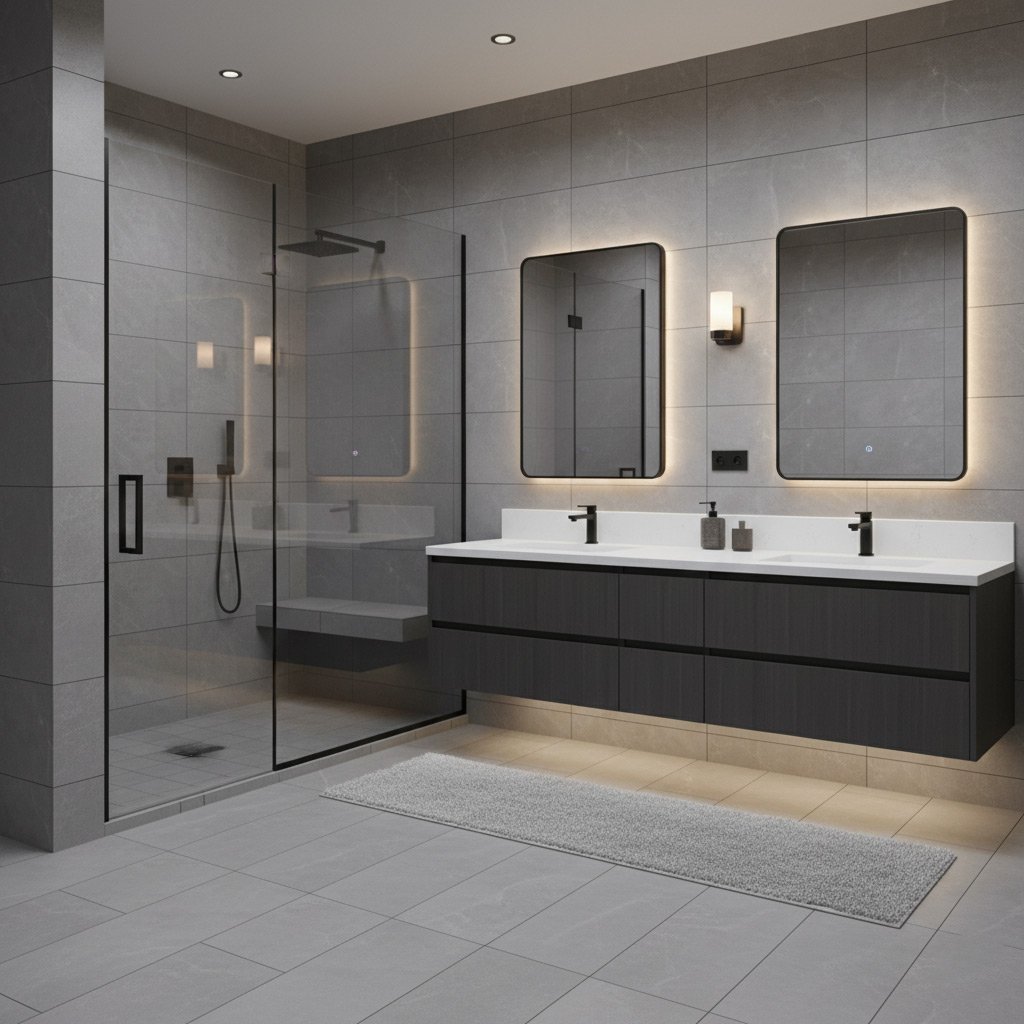
Case Study: Transforming a Classic Florence Home with a Luxury Walk‑In Shower
Before the Transformation
When we first stepped into the 1950s ranch, the bathroom felt cramped, the tile was cracked, and the shower was a cramped box that barely fit a foot. The owners dreamed of a spa‑like retreat but feared the cost and disruption. Our mission? Turn that dated space into a walk‑in oasis without breaking the bank.
The Design Decisions
We started with a simple layout: a rectangular, curbless shower that opens directly onto the vanity. The key choices were:
- Floor-to‑ceiling, matte‑black subway tiles – adds drama and hides water spots.
- Large‑format, slip‑resistant porcelain for the floor – feels like stone, lasts forever.
- A rain‑head shower valve paired with a handheld sprayer – gives the owners both luxury and flexibility.
- Recessed LED lighting with a dimmer – sets the mood without harsh glare.
Every element was selected to echo the warm desert tones of Florence while delivering a modern feel. The result? A shower that feels spacious, bright, and undeniably high‑end.
Result & ROI
Installation wrapped up in just ten days, and the homeowners were already scheduling weekend spa nights. The walk‑in shower added roughly 12% to the home’s market value, according to the latest local appraisal data. Bottom line: a well‑planned shower upgrade pays for itself in resale appeal and daily enjoyment.
Final Words
Before you swing that new shower door open, double‑check the little things that keep the whole project from slipping. A quick walk‑through of the waterproofing seams, the fixture torque, and the vent placement can save you a call to the plumber later.
Quick sanity checklist
- All drains are properly sloped and tested for flow.
- Shower pan is sealed with a continuous bead of silicone.
- Electrical outlets are GFCI‑protected and within code distance.
When the final tile is set and the lights glow, you’ve not just added a shower—you’ve boosted your home’s resale value and daily comfort. Need more ideas or a trusted crew to finish the job? Check out our New Showers page for the next step.
People Also Ask
How much does a new shower remodel typically cost in Florence, AZ?
A standard shower remodel in Florence usually ranges from $5,000 to $12,000, depending on size, materials, and labor. High‑end finishes or custom walk‑in designs can push the price above $15,000.Do I need a permit to replace a shower in my Florence home?
Yes, most shower replacements that involve plumbing or structural changes require a building permit from Maricopa County. Your contractor should handle the paperwork to ensure compliance with local codes.What tile styles complement the desert aesthetic of Florence homes?
Earth‑tone ceramic or natural stone tiles, such as travertine or slate, blend well with the desert landscape. Consider patterned mosaic accents to add visual interest without overwhelming the space.How long does a full shower installation take from demolition to finishing?
A typical walk‑in shower project takes 7–10 business days, including demolition, framing, waterproofing, tiling, and fixture installation. Complex layouts or custom features may extend the timeline by a few days.Can I upgrade my shower’s plumbing without tearing out the entire bathroom?
In many cases, a plumber can reroute or replace shower valves and lines through existing wall cavities, minimizing demolition. However, major layout changes often require opening the walls to meet code requirements.Florence Bathroom Remodel specializes in custom bathroom renovations, bringing modern design and lasting craftsmanship to homes throughout Florence, Arizona. With over a decade of experience, the team blends local knowledge with industry‑leading techniques to deliver functional, stylish spaces. Committed to personalized service, they work closely with each client to ensure every remodel reflects the unique character of the community.
Need Bathroom Remodel?
We deliver rapid, reliable HVAC repairs and installations to homes and businesses in Florence, AZ (85132, 85131, 85138) and surrounding communities, ensuring comfort and efficiency within hours of your call. Our technicians arrive on schedule and complete work efficiently, so you get back to normal faster.
Get Bathroom Quote